Setting Up Your Home Office | An Ergonomic Outlook

Moving from your office to your home:
This year, due to the pandemic, a lot of people have had to pack up their offices and transition to working from home. Considering how much time we spend working every day… this is a HUGE deal! To best care for your body, it is important to take some extra steps to ensure your home office is designed to fit YOU.
Why does my home office set-up matter?
On average, people work 8 or more hours per day – this is a long time to sit at a desk that is poorly designed for your body. With an improper workspace set-up, you may find yourself experiencing neck pain from looking down at your computer screen; low back pain from a lack of lumbar support in your chair; carpal tunnel syndrome from compression at your wrists; tennis elbow from typing all day without proper wrist alignment; worsened posture due to tightening of the pectoral/chest muscles and weakening of the back musculature.
So how do I properly set-up my workspace?
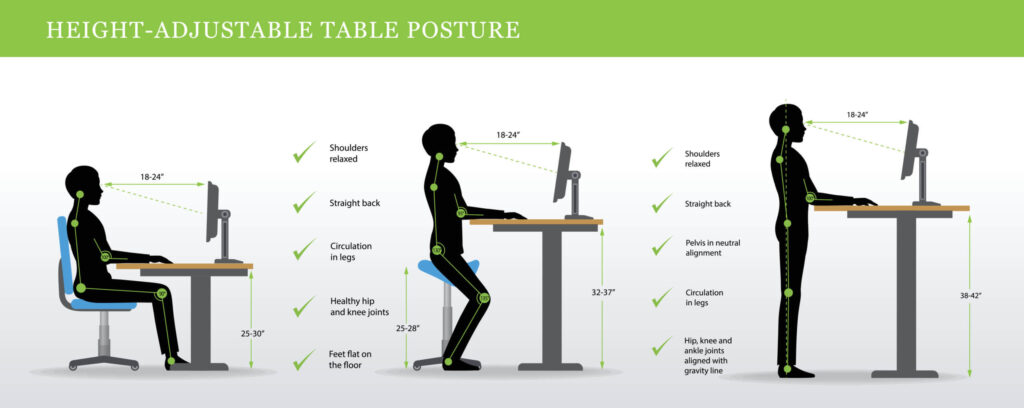
DESK POSITIONING:
Always start by positioning yourself correctly at your desk – after that, you can more easily adjust all the other components!
When seated at your desk, your elbows should never bend more than 90° – you will want your elbows to stay between 75° and 90° to avoid stain. Additionally, keeping your elbows below 90° will eliminate the need to rest your wrists/forearms on the edge of your desk – thus decreasing compression at the carpal tunnel and reducing the likelihood of developing carpal tunnel syndrome.
If you aren’t able to adjust the height of your desk (which is often the case… especially when working from home!) simply adjust your chair height.


THE 90 90 90 RULE:
When seated in your chair, your hips, knees, and ankles should all be bent to 90°. It’s likely, though, that you have just adjusted your chair height to accommodate the recommendation mentioned above and now your hips, knees, and ankles aren’t at 90° – don’t worry, there are things you can do to adapt your workspace to fit both recommendations!
If your feet don’t make full contact with the floor, your knees and hips are prone to poor alignment as well. This can cause the edge of your seat to push into the backs of your legs – compressing the sciatic nerve and causing numbness and tingling throughout your legs and feet. To avoid this, place a small footstool under your feet to achieve proper alignment. If you don’t have the capacity to buy a footstool, a few reams of paper, a shoebox, or even a basket turned upside would work – you can be creative!
LUMBAR SUPPORT:
Does your chair have a small curve that pushes into your lower back? That curve is designed to better your posture and decrease the amount of stress placed on the musculature of your low back! If you don’t have this curve, or you feel the curve of your chair is not supportive enough, try placing a small pillow behind the small of your back.
ARMRESTS:
If your chair has removable armrests – take them off! Armrests, while seemingly comfortable, actually promote poor posture.
COMPUTER SCREEN:
The top of your computer screen should be at eye level to avoid neck strain from sustained flexion. If you don’t have the capacity to buy a stand for your computer screen, use books or a shoe box to get your screen to the correct height! Additionally, your computer screen should be an arms length away, when you are seated properly in your chair.
If you have 2 computer screens, put them as close together as possible to avoid neck strain from repetitive excessive rotation.

THE LAPTOP DILEMMA:
If you have a laptop, you are either forced to crane your neck down to look at the screen, or hike your hands up to type on the keyboard. Both scenarios are highly undesirable and put a lot of stress on the body.
To best accommodate your body – and decrease the likelihood of injury – you should set your laptop on a stand (or books) and purchase a keyboard to place on your table/desk.
KEYBOARD:
If you have a keyboard that has little pegs underneath of it to prop it up at an angle… close the pegs! You want your keyboard to be as flat as possible to discourage increased wrist extension. With excessive wrist and finger extension – you are more prone to developing lateral epicondylalgia, or tennis elbow. Try to keep your wrists as flat as possible when working at your computer.
If you notice you lay your wrists on your desk when typing – and really pull your wrists back when typing – you may be a good candidate for a wrist support cushion/pad. If you do purchase one of these, however, keep in mind that it is not to be used as a resting place (this will compress the carpal tunnel) but rather use it as a glide.
If you are currently experiencing pain throughout any area of your body and believe it may be because of your workspace – pop on in for an evaluation and our skilled Doctors of Physical Therapy and Occupational Therapy can help you personalize your desk space even further to alleviate your pain! Contact us or call at 260-739-0300 today!